Summary:
Teamcenter BMIDE is the tool for performing data model customizations.
Pre-requisite:
- Install Teamcenter BMIDE.
Overview:
- Start Business Modeler IDE.
- Import a BMIDE template project.
Details:
1. Start Business Modeler IDE:
Locate Business Modeler IDE on your machine. Click on ‘Business Modeler IDE’ to start the IDE.

2. Workspace location for BMIDE Custom Project:
Enter a folder location as Workspace for new BMIDE Custom Project.

3. BMIDE with default ‘Getting Started’… will show up:
When BMIDE is launched for the first time, the IDE will show ‘Getting Started’ window.

4. Import BMIDE template:
Invoke File => Import… menu.

5. Locate and expand Business Modeler IDE:

6. Select Import a Business Modeler IDE Template Project type:

7. Enter template project folder path:
Click on Browse button to locate the template folder.

8. Select the template project folder:
Click on OK button.

9. Select Dependent templates directory:
Click on Browse… button

10. Select model folder under %TC_DATA% folder:
Click on OK button.

11. Click on Finish button:

12. The template project is imported and successfully loaded into BMIDE:

Congratulations, you have successfully imported custom BMIDE template. I hope this post helps.
Summary:
Teamcenter BMIDE is the tool for performing data model customizations.
Pre-requisite:
- Install Teamcenter BMIDE.
Overview:
- Start Business Modeler IDE.
- Create a new BMIDE template project.
- Open Advanced perspective.
Details:
1. Start Business Modeler IDE:
Locate Business Modeler IDE on your machine. Click on ‘Business Modeler IDE’ to start the IDE.

2. Workspace location for BMIDE Custom Project:
Enter a folder location as Workspace for new BMIDE Custom Project.

3. BMIDE with default ‘Getting Started’… will show up:
When BMIDE is launched for the first time, the IDE will show ‘Getting Started’ window.

4. Create a new Business Modeler IDE Template Project:
Invoke File => New => New Business Modeler IDE Template Project menu.

5. New BMIDE Template Project wizard:
The wizard would shows up, that would help create a custom BMIDE template project.

6. Enter required details for BMIDE Template Project:
- Prefix: All BMIDE template projects have a prefix. All elements created under this template will get the same prefix. [ The prefix helps BMIDE differentiate between OOTB Part and ABC4Part. ]
- Template Name: This name that will be used by Teamcenter Installation to refer to custom template.
- Template display name: This name is used as display name for the template.
- Template description: The creator of template needs to provide details of template here.
- Dependent templates directory: The location where all the templates already installed into TC installation are placed. [ All the templates installed into TC are placed into %TC_DATA%/model folder.]
Click Next to proceed.

7. Select dependent BMIDE Templates:
The custom template might use template elements from multiple BMIDE templates.
Select all the BMIDE template the custom template will depend on.
Click Next to proceed.

8. Select supported languages:
If the custom template needs to support languages other than English (United States), this is the place to select them.
Click Next to proceed.

9. Enter name of namespace:
For some customizations BMIDE might generate the code. The code will get generated under the Namespace name entered here.
Click Next to proceed.

10. Enter TC_ROOT and MS Visual C++ compiler path:
Along with the code, the BMIDE generates makefiles ( ant scripts and other build artifacts). The TC_ROOT and MS Visual C++ compiler paths are required for makefiles.
Click Next to proceed.

11. Enter SOA Client and dot NET locations:
For SOA Code & SOA makefiles generation, the BMIDE needs access to soa_client folder and dot Net install location.
Click on Finish button.

12. BMIDE shows newly created custom template:
The custom project gets created, and the BMIDE will show elements from all dependent templates in the IDE.

13. Launch BMIDE Advanced perspective:
The BMIDE supports two perspectives. a) Standard & b) Advanced.
Click on Window => Open Perspective => Advanced.

14. BMIDE shows Advanced Perspective:

Congratulations, you have successfully created a new custom BMIDE template. I hope this post helps.
Summary:
The com.teamcenter.rac.kernel.TCComponent (and classes derived from TCComponent ) represents Teamcenter data model business objects ( or classes) in Rich Client.
Pre-requisite:
- Create a Teamcenter plugin project.
- You need to have custom data model business objects, that you plan to map to TCComponent classes.
Overview:
- Create custom data model business objects (or classes).
- Create JAVA classes for TC data model business object (or class).
- Associate JAVA class to data model business object (or class) using teamcenter extension.
Details:
1. Create custom teamcenter data model business objects (or classes) :
The Teamcenter data model can be customized using TC BMIDE tool. – How to use BMIDE? – How to create custom data model business objects (or classes)? will be covered as part of a dedicated post.
2. Create a JAVA class for TC data model business object (or class) : The data model business object (or class) that we are trying to map here is MyItem. The business object MyItem is descendent of Teamcenter business object Item.
- Create a JAVA class, name it “ABC9ComponentMyItem.java”.
- Extend class “ABC9ComponentMyItem” from “TCComponentItem” class.
- Create one more JAVA class, name it “ABC9ComponentMyItemType.java”.
- Extend class “ABC9ComponentMyItemType” from “TCComponentItemType” class.
- If any behaviour needs customization, the same can be provided by Implementing/Overriding required methods in ABC9ComponentMyItem(Type) class.
NOTE : Teamcenter recommends that all the customizations should use a prefix format for all customized entities. The recommended format for prefix… <Three Alphabetical Characters><One Digit Between 4-9>.
3. Associate JAVA class to data model business object (or class) using teamcenter extension: Your TCComponent look alike class for custom business object is ready. But teamcenter does not know about your component class. You need to associate your java class to business object using teamcenter extension.
- Go to plugin.xml file for your plugin project.
- Open the plugin.xml in plugin editor in Eclipse.
- Go to Extensions section.
- Add an extension com.teamcenter.rac.kernel.Kernel_Components to the plugin.xml file.
- The extension needs info as shown below…
<extension id=“com.teamcenter.rac.kernel”
point=“com.teamcenter.rac.kernel.Kernel_Components”>
<entry id = “MyItem”
name=“com.mycompany.rac.kernel.ABC9ComponentMyItem”
type=“com.mycompany.rac.kernel.ABC9ComponentMyItemType”
icct=“com.teamcenter.tc.kernel.icctstubs.ICCTItem” />
</extension>
Save plugin.xml file. compile and build your plugin. Deploy the plugin to Teamcenter.
Benefits:
- ABC9ComponentMyItem is recognized by the Teamcenter framework. The custom class would become integral part of TC RAC framework.
- TC would create an object of ABC9ComponentMyItem (and not TCComponentItem) whenever an object of MyItem type is needed in RAC.
- The source code would be better organized if all the RAC/UI customization related to MyItem object remains within ABC9ComponentMyItem(Type) class.
- The source would be maintainable and readable.
- Developers can clearly distinguish between Item (TCComponentItem) and MyItem (ABC9ComponentMyItem) objects in RAC code.
- Many more benefits…
Congratulations, you have sucessfully added a component class to Rich Client framework. I hope this post helps.
…
Summary:
Teamcenter UI customizations are done using Teamcenter custom plug-ins. The UI customizations can be created in Eclipse IDE.
Pre-requisite:
- Install Eclipse IDE ( Preferably Eclipse Classic IDE from www.eclipse.org ). It is recommended that you use correct version of Eclipse IDE.
- For TC10.1+ use Eclipse 3.8
- For TC9.1+ use Eclipse 3.6.
- For TC 8.0+ use Eclipse 3.5.
- For Tc2007 use Eclipse 3.2 or 3.3
- Install Teamcenter Rich Client 2 Tier (Tc2007 / TC 8.0+ / TC 9.1 / TC 10.1 ).
Overview:
- Create a new Eclipse Plug-in project.
- Configure Target platform.
- Run Teamcenter RAC from Plug-in Development Environment.
Details:
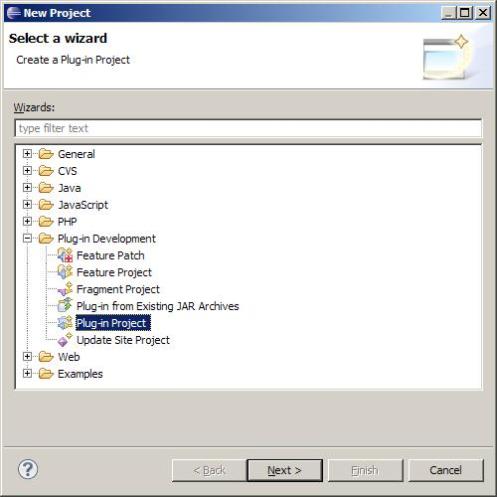
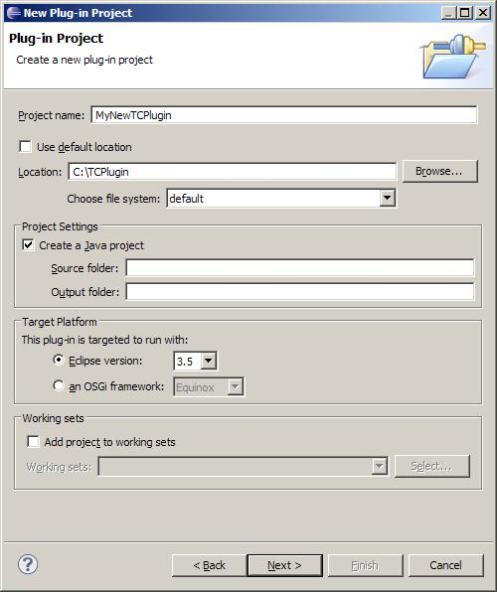
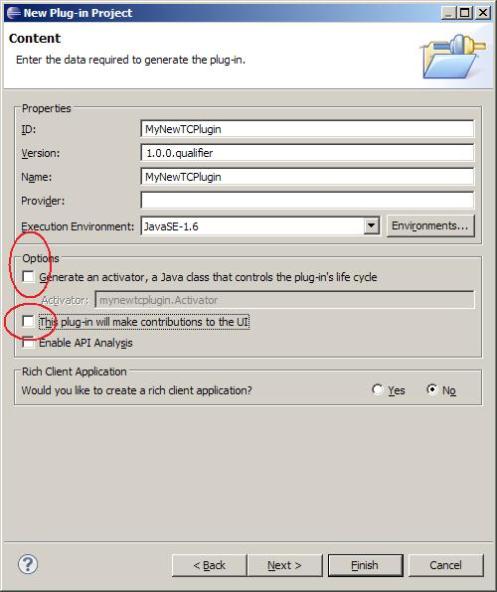
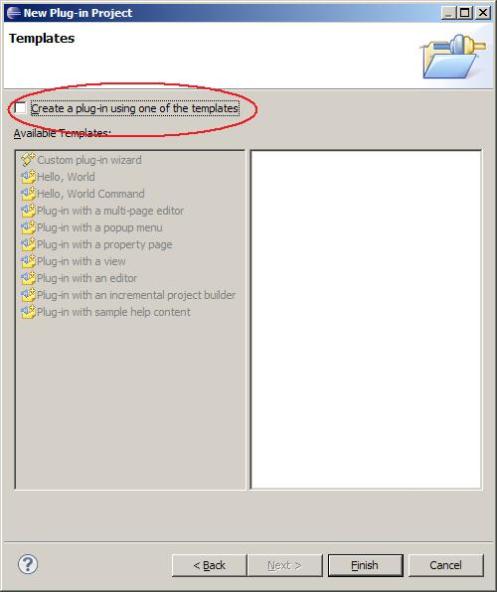
1. Create a new Eclipse Plug-in project :
2. Configure Target platform : Change the plug-in target platform from default eclipse platform to Teamcenter Rich Client platform.
- Hit “Windows->Preferences” Menu in Eclipse.
- Expand “Plug-in Development”, select “Target Platform”.
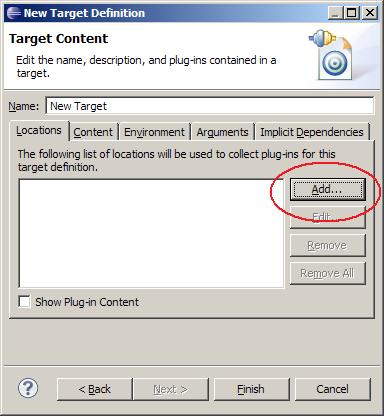
- Click on “Add…”
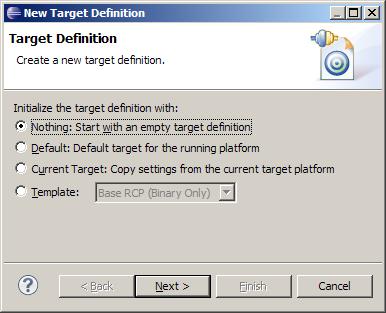
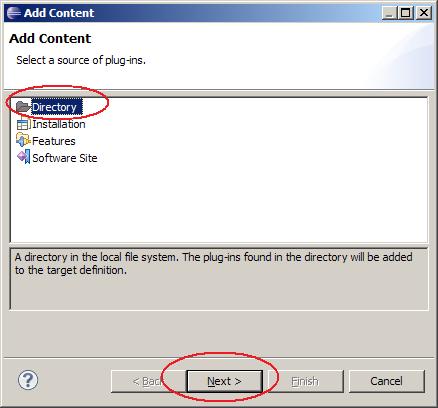
- Add Content from TC_ROOT/portal (or TC_ROOT/rac) folder.
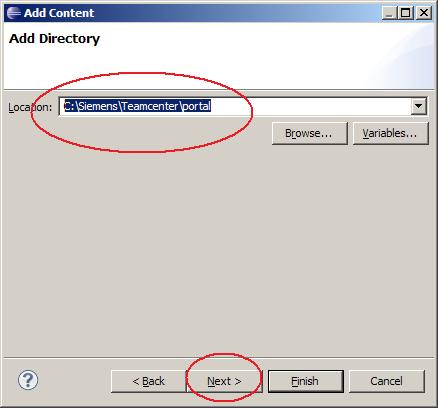
- Browse to “TC_ROOT”\portal directory (or TC_ROOT/rac), click Next…
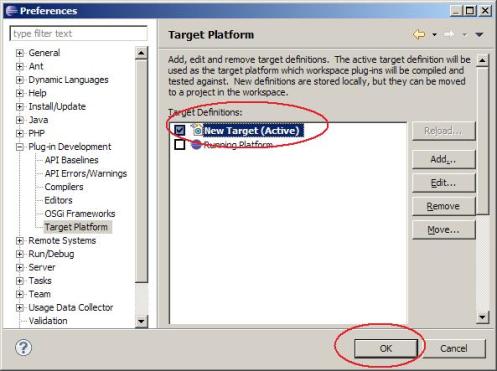
- Select the New Target Platform, and Click “OK”.
3. Run Teamcenter RAC from Plug-in Development Environment: Check if the Plug-in development environment is configured correctly.
- Hit “Run -> Run” in Eclipse IDE.
- When executing this for first time, a dialog would pop up, select “Eclipse Application” and click OK.
- The Teamcenter RAC is started.
- Invoking TC RAC from Eclipse does not automatically start TAO/TcServer, you may need to invoke it manually by executing %TC_ROOT%\portal\server_configs\start_imr.bat for Tc2007 ( %TC_ROOT%\start_imr.bat for TC 8.0+ / TC9.1+ / TC10.1+ )
- Enter Username and Password in Teamcenter login screen, and login. Check if you are able to login to Teamcenter.
- If you are able to login, your plug-in environment configuration is working well.
Congratulations, you are all set for your first custom plug-in for Teamcenter. I hope this post helps.
…
How to customize OR add a custom Menu Item?
How to create a custom Teamcenter Application? ( Perspectives and Views) etc will be discussed in separate detailed posts.
